
EURUSD M15 TF Analysis

Key Observations:
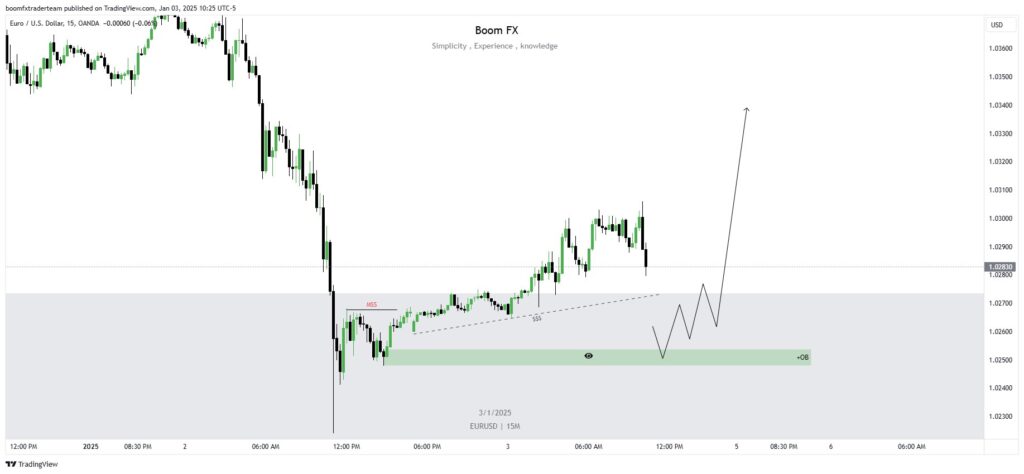
- Market Structure Shift (MSS):
- A clear MSS is identified, indicating a potential reversal from a previous bearish trend.
- Order Block (OB):
- A bullish OB is marked in the demand zone (green area), suggesting a significant area where institutional orders might have been placed.
- Liquidity Grab ($$$):
- Liquidity below the trendline and within the demand zone has likely been targeted, setting the stage for a bullish reversal.
- Trendline Break:
- A tentative bullish trendline is forming, providing additional confirmation of upward momentum.
- Projected Movement:
- The forecast shows a pullback into the OB, followed by a strong bullish continuation toward higher levels.
Potential Trade Setups:
Bullish Setup:
- Entry:
- Look for price retracement into the marked OB zone (around 1.0250–1.0260).
- Wait for bullish confirmation patterns on lower time frames (e.g., M5), such as engulfing candles, pin bars, or breakouts of minor highs.
- Stop Loss:
- Place the stop loss slightly below the OB zone (around 1.0240) to account for potential wicks or stop hunts.
- Take Profit:
- Target resistance levels at 1.0310 and 1.0340 for a favorable risk-to-reward ratio.
Risk Management and Tips:
- Risk-Reward Ratio:
- Aim for a minimum 1:2 or higher risk-reward ratio.
- Refinement on Lower Time Frames:
- Fine-tune entries using smaller time frames (M5 or M1) for precision.
- Monitor Key Levels:
- Watch for reactions at intermediate resistance levels (e.g., 1.0290).
- Economic Events:
- Be cautious of high-impact news affecting EUR or USD, as they can cause unexpected volatility
Alternative Scenario:
- If the OB fails to hold and price breaks below, reconsider the bias and look for bearish setups targeting lower support levels.
Leave A Comment